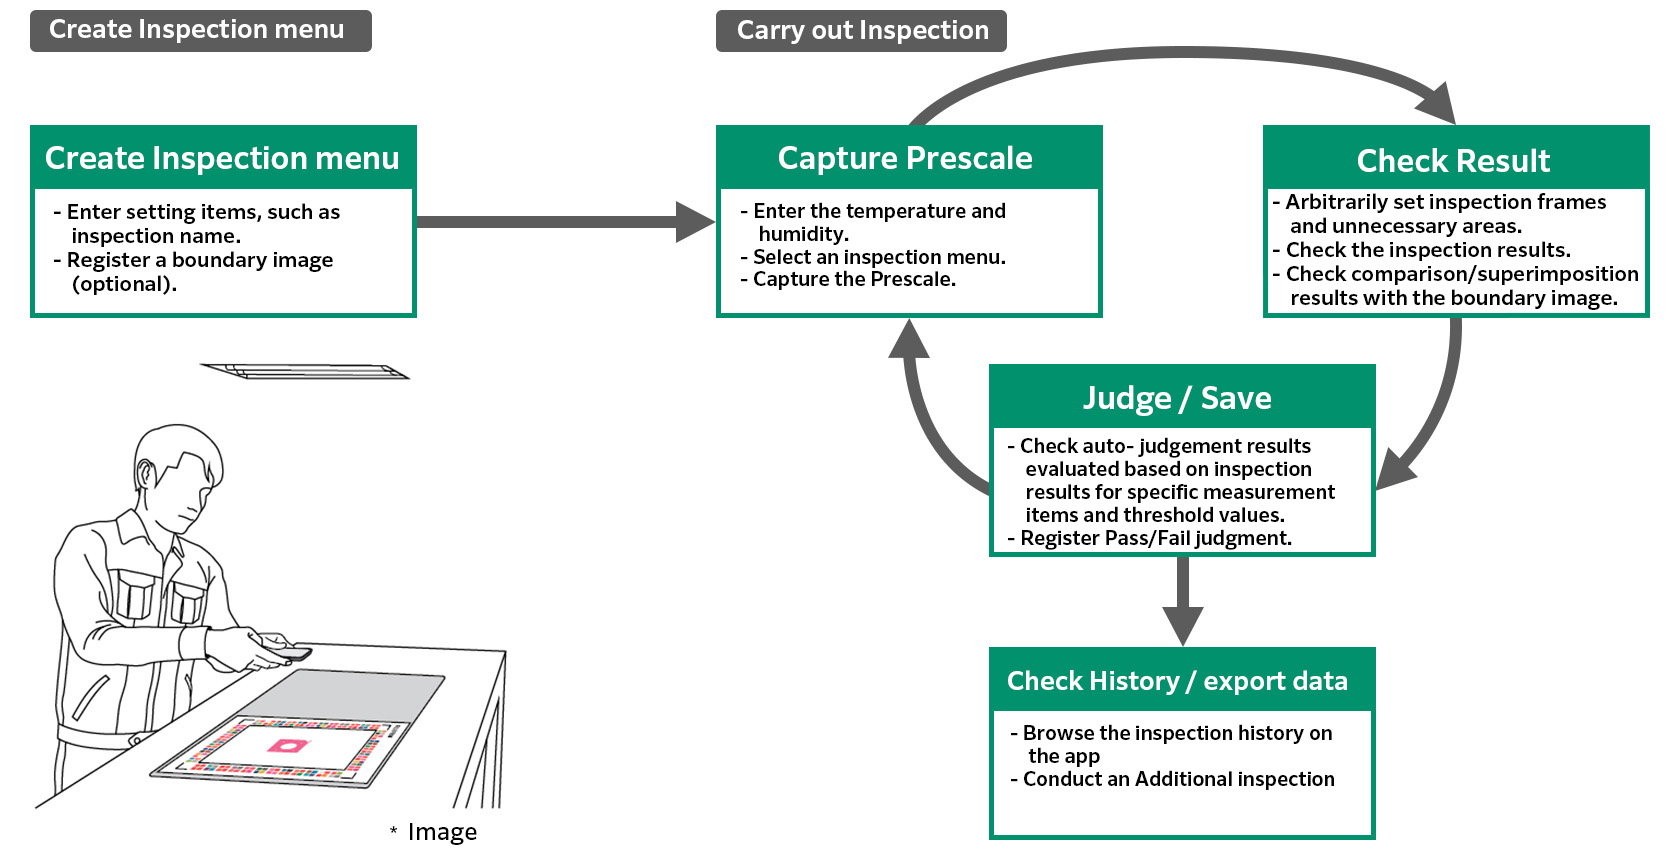
The flow of inspections using FUJIFILM Prescale Mobile is as follows:
You can inspect using FUJIFILM Prescale Mobile .

For simple instructions on how to operate each flow, please consult the Manual.
Allows you to inspect Prescale individually.
When a boundary image is registered, the inspected Prescale and the boundary image can be compared.
The color bar on the left displays the color that indicates the pressure in the inspection.
You can register a boundary image and superimpose the registered image and the inspected Prescale. This allows you to compare two images by generating another image which analyzes pressure differences.
The color bar on the left indicates the degree of matching between the pressure values in the boundary image and inspection image.
High pressure values are displayed in red.
Low pressure values are displayed in blue.
Matching pressure values are displayed in green.
Pressure values lower than the set value will be invalidated.
You can register the value when registering an inspection menu.
You can get the app to carry out automatic pass/fail judgments and display the analytical results by setting a threshold value or a threshold range for physical quantities in advance.
Sets whether or not auto judge is performed in this item. Select “Valid” or “Invalid.”
Selects whether to set the upper limit for judgement. Select “Valid” or “Invalid.”
If “Valid” is selected here, the judgment will be “failure” if the analysis result exceeds the upper limit.
Tap a number to change the upper limit value.
Selects whether to set the lower limit for judgment. Select “Valid” or “Invalid.”
If “Valid” is selected here, the judgment will be “failure” if the analysis result is smaller than the lower limit.
Tap a number to change the lower limit value.
The setting is completed and the display returns to the “Auto-Judgement” screen.
When “Valid” is selected for “Setting Status,” the check mark will be placed on the item you have set.
- * Up to three items can be registered for auto judgement. These will be AND conditions.
The “Auto-Judgement” items are set and the display returns to the “Add inspections” screen.
A boundary image can be registered by capturing the Prescale.
- *When “Superimpose inspection” is selected for inspection type, “Boundary image” is a required field.
You can set the area of the captured image to be excluded from the inspection.
This function can be used for boundary images set when registering an inspection menu.
You can add up to ten frames to a captured image, so that only the analysis results within the frames will be displayed.
Inspection frames set when registering an inspection menu will be automatically applied after capturing the Prescale for inspection.
Put the calibration sheet with the “FUJIFILM” logo side up, and then place the Prescale with the chemicals-applied side (nonglossy side) up on the sheet so that it fits squarely inside the black frame of the calibration sheet.
Capture the Prescale by aligning the camera screen with the L-shaped marks on the four corners of the calibration sheet.
To redo capturing, select “Re-capture.”
The line width can be changed at the bottom of the screen.
Inspection frames can be set only when a boundary image has been registered.
If no boundary image has been registered, the camera will be activated. Please register a boundary image using the camera.
Up to ten inspection frames can be set.
Switches to “Add square frame” mode (icon turns blue).
Dragging the image will add a square inspection frame.
Switches to “Add circular frame” mode (icon turns blue).
Dragging the image will add a circular inspection frame.
Switches to “Add rectangular frame” mode (icon turns blue).
Tap the screen to set the four vertices of the inspection frame. A rectangular box connecting the tapped points in sequence will be added.
Switches to “Nine-segmented frame” mode (icon turns blue).
Dragging the image will add a square inspection frame that is segmented into ninths.
Delete inspection frames
Select “Delete inspection frame” to display the dialog box for deletion.
Select the number of the inspection frame you wish to delete, and the selected inspection frame will be deleted.
It is a table showing pressure values of the captured Prescale.
The colors and pressure value range of a color table can be changed.
- The “Pressure value color table” and “Superimposing color table” can be set for each Prescale type (HT_LLW/MW/LW/LLW/LLLW/4LW/5LW).
- The color table set when the inspection menu was registered will be used. If you edit the color table, you will be required to re-register the inspection menu.
In single inspections, the ranges displayed in the second and lower columns are Custom Press Areas.
Up to six areas can be set in the second to seventh columns.
Results are shown in two items of the analysis results, namely “Custom Press Area” and “Custom Press Area Ratio.”
The following describes how to set them:
- Tap “Pressure value color table” on the “Add inspection” screen.
- Capture a Prescale sample to be used as a boundary image.
- Press and hold the color bar in the left-hand side of the screen for at least two seconds.
- Tap “Pressure value color table” on the “Setting” screen.
- Select the Prescale type to change.
Tap the “+” icon to add a cell.
Tap the trash can icon to delete a cell.
An inspection menu can be edited if no inspection results have been registered.
Tap the item you wish to change to update the settings.
- * If any inspection has already been performed through the inspection menu, you will need to change the inspection name. Be sure to save it as a new inspection menu.
To recover deleted inspection menus
To recover deleted inspection menus
Deleted inspection menus can be restored.
1. Tap “Deleted inspection menu” on the “Setting” screen.
Here displays a list of inspection menus that have been deleted.
2. Select the inspection menu to recover
A check mark is placed on each selected inspection menu.
3. Tap “Recover.”
All inspection menus with a check mark are displayed again on the “Inspection” screen.
You can set the area of the captured image to be excluded from the inspection.
This function can be used for boundary images set when registering an inspection menu.
The line width can be changed at the bottom of the screen.
You can add up to ten frames to a captured image, so that only the analysis results within the frames will be displayed.
Inspection frames set when registering an inspection menu will be automatically applied after capturing the Prescale for inspection.
Inspection frames can be set only when a boundary image has been registered.
If no boundary image has been registered, the camera will be activated. Please register a boundary image using the camera.
Up to ten inspection frames can be set.
Switches to “Add square frame” mode (icon turns blue).
Dragging the image will add a square inspection frame.
Switches to “Add circular frame” mode (icon turns blue).
Dragging the image will add a circular inspection frame.
Switches to “Add rectangular frame” mode (icon turns blue).
Tap the screen to set the four vertices of the inspection frame. A rectangular box connecting the tapped points in sequence will be added.
Switches to “Nine-segmented frame” mode (icon turns blue).
Dragging the image will add a square inspection frame that is segmented into ninths.
Delete inspection frames
Select “Delete inspection frame” to display the dialog box for deletion.
Select the number of the inspection frame you wish to delete, and the selected inspection frame will be deleted.
Measurement results: Information shown on the history screen (Prescale type, pressure type, etc.) and analysis results (average pressure, pressure area, etc.)
Images: Image files, such as captured original images, analysis images, and color bar images
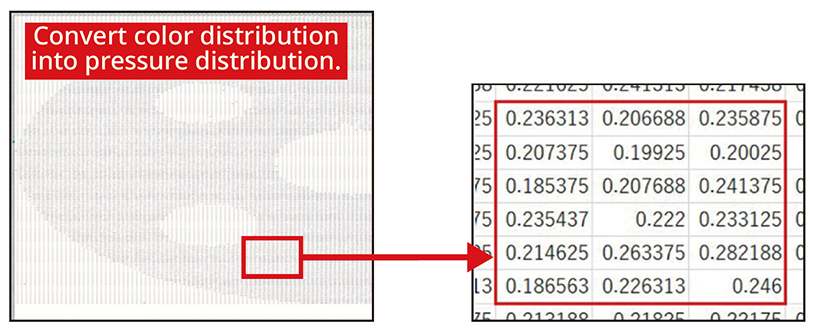
Pressure maps: Output data on the pressure value of each cell. The resolution of each cell can be adjusted separately.
| Calibration sheet size | Resolution |
|---|---|
| Capturing size A4 | 0.25 – 2㎟ |

Select multiple histories in a batch
Multiple inspection results can be selected in the “Inspection history” screen to delete or forward them in batches.
- * “Pressure map” data cannot be collectively output for multiple inspections. Please output data for each inspection, one by one.
1. Tap “Select” on the “History” screen.
2. Select the inspection results to output.
Blue check marks are placed in the selected inspection results.
- Select “Select all” to place check marks in all inspection results.
- Select “Cancel” to return to the normal “History” screen.
3. Tap “Save file”
All checked inspection results will be exported.
You can add new settings and changes to inspection results that have already been registered, such as removal of unnecessary areas and setting/changing inspection frames.
- * When saved, the additional analysis results will be named differently from the original inspection results.
- * Please note that there is no way of retrieving inspection results once deleted.
Select multiple histories in a batch
Multiple inspection results can be selected on the “Inspection history” screen to delete or output them in batches.
1. Tap “Select” on the “History” screen.
2. Select the inspection results you want to delete.
Selected inspection results become marked with blue checks.
- Select “Select all” to place check marks in all inspection results.
- Select “Cancel” to return to the “History” screen.
3. Tap “Delete.”
All checked inspection results will be deleted.
It is a table showing pressure values of the captured Prescale.
The colors and pressure value range of a color table can be changed.
- The “Pressure value color table” and “Superimposing color table” can be set for each Prescale type (HT_LLW/MW/LW/LLW/LLLW/4LW/5LW).
- The color table set when the inspection menu was registered will be used. If you edit the color table, you will be required to re-register the inspection menu.
In single inspections, the ranges displayed in the second and lower columns are Custom Press Areas.
Up to six areas can be set in the second to seventh columns.
Results are shown in two items of the analysis results, namely “Custom Press Area” and “Custom Press Area Ratio.”
The following describes how to set them:
- Tap “Pressure value color table” on the “Add inspection” screen.
- Capture a Prescale sample to be used as a boundary image.
- Press and hold the color bar in the left-hand side of the screen for at least two seconds.
- Tap “Pressure value color table” on the “Setting” screen.
- Select the Prescale type to change.
Tap the “+” icon to add a cell.
Tap the trash can icon to delete a cell.
The inspector can be arbitrarily registered.
The registered inspector is selected when launching the app and the name is displayed as the “Inspector” in the inspection result information.
You can select either to arbitrarily name inspection results yourself or to have them automatically named when saving inspection results.
When OFF is selected, inspection results will be named according to the following format: “inspection name + the year, month, day and time the data is registered.”
When ON is selected, you can arbitrarily name inspection results yourself each time you save them.


